Improve your skills by copying! A step-by-step course on the human body for beginners
Mogu
Video Course
Drawing
Copying
Thick coating
Improvement Of Skill
Character
In this course, even beginners will comfortably enhance their illustration skills by progressively advancing their sketching techniques. You will learn the fundamentals of artistic anatomy and effective tips for drawing from photo references, equipping you with the ability to confidently draw natural human figures and master coloring.
Videos:
15
Playback:
3:55:57
Study:
18:55:57
Caption:
None
Three reasons to choose this course
Turn "I can't draw" into "I can draw"! Step-by-step copying course
Have you ever tried to jump right into drawing the human body, only to feel frustrated and give up?
In this course, you'll start by sketching simple line art. From there, you will gradually step up to drawing shoes, clothing, and finally, the human figure.
This step-by-step approach allows even beginners to progress without feeling overwhelmed, helping you naturally build the confidence that you can draw.

Illustrations are all about characters! Learn to draw the human body thoroughly!
ust trying to copy what you see isn't enough to master drawing the human body. It's uniquely challenging.
In this course, you will learn the shape and placement of muscles through artistic anatomy. We then provide detailed instruction on how to apply that knowledge to your sketching, coloring, and reference studies.
・With every drawing session, your understanding will deepen, allowing your hand to move more naturally and intuitively.
・By learning to simplify the body into basic shapes (construction), you will develop the ability to draw the human figure freely.
・You will move beyond just drawing what you see and truly understand why it is drawn that way

Practice and tips for improving your illustration skills
Continuous growth is the key to a long and successful career as an illustrator.
In this course, the instructor will introduce effective learning strategies—drawing from the efficient study habits they developed while qualifying for professional certifications. You'll also discover helpful books and practice methods for improving your illustration skills, all explained in an easy-to-understand way.
Let's find a practice routine together that allows you to make genuine progress while still enjoying the process of drawing.

Six things you can learn

Not sure where to begin your drawing practice? — Let's improve efficiently with a self-study method honed through professional certification exam strategies!
Do you ever find yourself wondering, 'How can I really get better at drawing?'
In this course, the instructor, who has successfully passed multiple professional certification exams, will share the efficient learning strategies they mastered. You'll learn how to apply these proven self-study "hacks" to significantly improve your illustration skills.
Supercharge your drawing skills through sketching!
This course provides a step-by-step guide on how to approach sketching from reference. You'll start by drawing from illustrations and then advance to tackling photo references. This process helps you build a strong balance between your observational skills (drawing what you see) and your expressive abilities.
When you learn the right sketching methods for your specific goals, you can improve your skills efficiently and reliably!

Unlock the Secrets of Photo Sketching! An Easy-to-Follow Step-by-Step Guide.
We will carefully explain, step by step, how to read and interpret information from a photograph, such as its shapes and values (light and shadow). Let's build a solid foundation in sketching from reference to enhance your practical drawing skills!

The Secret to Drawing Natural Figures? It All Starts with a Little Bit of Knowledge.
You don't need to memorize every single muscle!
Instead of trying to cover all of anatomy, this course carefully selects and explains the key points that are actually useful for drawing.
By understanding just a little about how the body is structured, you can dramatically expand your range of artistic expression.

Learn to draw the human body starting from simple shapes!
The human body may seem complex, but you can draw it using simple, shape-based steps.
By gradually refining these forms while visualizing the underlying muscles, anyone can achieve a natural-looking sketch. We will also provide detailed guidance and tips on how to draw effective line art!

Master Coloring! A Guide to 3 Coloring Techniques
This course explains a variety of coloring techniques, from cel shading and painterly styles to the grisaille method. You will get a solid understanding of the unique characteristics and tips for each, helping you discover the coloring style that perfectly fits your illustrations.
curriculum
Part 1 Introduction
Introduction
・About the Instructor
・About This Course
・Why Sketching from Reference is Effective

Part 2: Self-study methods
Self-study methods
Applying Certification Exam Study Methods to Drawing Practice
How to Stay Motivated in Self-Study
The Most Efficient Way to Improve

Part 3: Let's try copying
Chapter 1: Effective ways to copy
Difficulty Levels in Sketching from Reference
Changes You'll See by Consistently Sketching
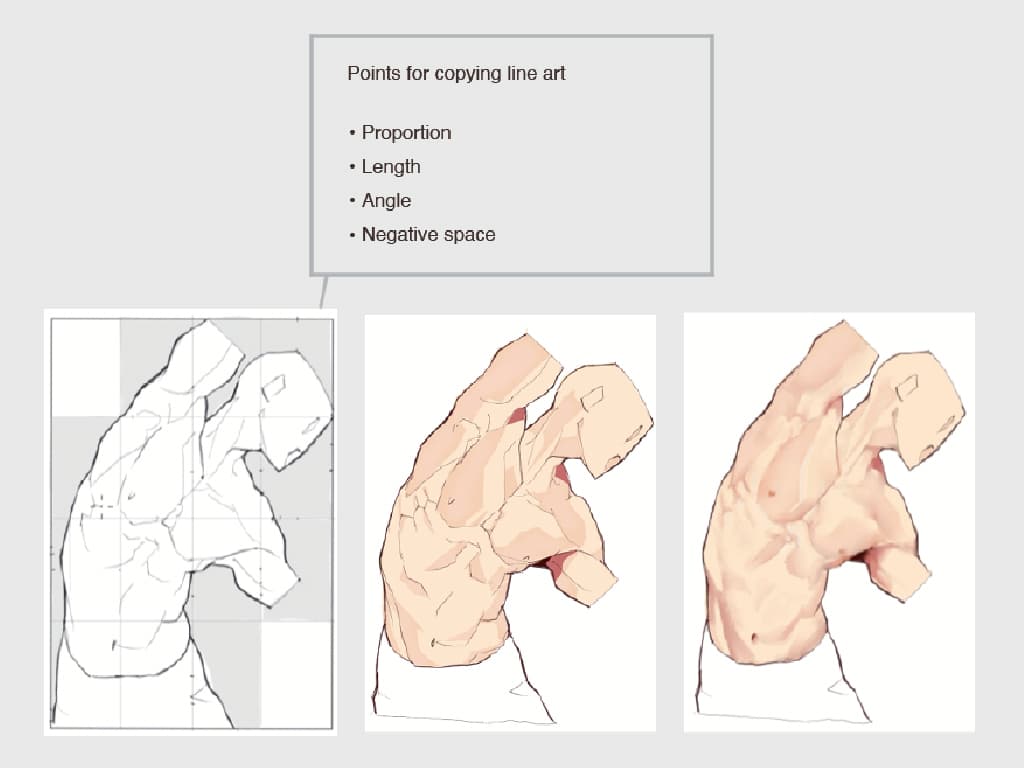
How to Sketch Line Art from Reference

How to Effectively Use the Grid Method
Observe the reference → Mark key points in the grid squares → Draw the lines → Overlay on the reference to check. Following this sequence makes it easy to visually spot discrepancies ("Where is it off?"), significantly improving your ability to correct errors.

Chapter 2: Recommended books
Recommended Books for Sketching Practice
Recommended Books for Learning Artistic Anatomy
Other Recommended Books

Chapter 3: Copying Practice ① Leaves
What Information to Read from a Photograph
Understanding Leaf Structure, Silhouette, Color, and Values
Understanding Subsurface Scattering (SSS)
Practice: Sketching a Leaf

Chapter 4: Copying Practice ② Trees
Tree Types and Structure
Tips for Coloring Trees
Practice: Sketching a Tree

Steps for Drawing Trees
1.Visualize the tree as a sphere (or circle) to understand its overall shape and values (light and shadow). 2.Define the leaf shapes and add darker tones at the boundaries to create three-dimensionality. 3.Add details using lighter colors.

Chapter 5: Copy Practice 3: Shoes
Anatomy of a Leather Shoe (Parts and Names)
Different Shapes of Leather Shoes
Toe Designs
Differences in Lacing Systems
Practice: Sketching a Shoe

Chapter 6 Copy Practice ④ T-shirt
Types of Folds and Wrinkles
Monochrome Sketching Practice
Color Sketching Practice
Let's Try Coloring Using Gradient Maps

Steps for a Monochrome T-Shirt Study
1.Think of wrinkles as triangles and separate the light and dark areas. 2.Blend the boundaries between the light and dark areas using a mixing (blender) tool. 3.Refine the wrinkle shapes while carefully referencing the photo. 4.Adjust the values and shapes to finish.

Part 4: Learn artistic anatomy
Chapter 1 Art Anatomy ①
Why Study Artistic Anatomy?
Key Muscles to Remember
Sternocleidomastoid, Deltoid, Serratus Anterior, External Oblique, Rectus Abdominis

Chapter 2 Art Anatomy ②
Trapezius, Latissimus Dorsi
Biceps Brachii, Brachialis, Triceps Brachii
Brachioradialis, Extensor Carpi Radialis Longus
Muscles of the Lower Limb

The "Sternocleidomastoid": Essential for Drawing Masculine Necks
This is the muscle located on the side of the neck, connecting the clavicle and sternum to the bone behind the ear. Drawing this line accentuates masculine strength. A key tip is to focus on how the muscle bulges when the neck is twisted.

Part 5: Let's try to draw a diagram of the human body (upper body)
Chapter 1: How to draw the human body "Sketch ① Upper body"
Simplifying the Human Body from Photos into Shapes
Drawing the Egg-Shaped Guideline
Adding Muscles as Simplified Shapes

Chapter 2: How to draw the human body "Sketch 2: Upper body"
Simplifying the Muscles of the Back
Let's Draw Line Art Based on the Simplified Shapes
Tips for Drawing Effective Line Art

Steps for Drawing the Upper Body using Construction (Simple Shapes)
1.Draw two circles (or ovals) representing the ribcage and pelvis. 2.Draw the clavicles and arms, using circles to represent the shoulders. 3.Draw the upper body muscles following these guidelines. 4.Draw the abdominal muscles.

Part 6: Let's draw hands
Chapter 1 How to Draw the Human Body 3 Hands Part 1
Structure of the Hand

Steps for Drawing Hands using Construction
1.Draw the base for the hand and fingers. 2.Place circles at the joints and draw cylinders for the finger segments. 3.Erase the base lines and add volume to the palm. 3.Draw the final line art over this geometric foundation.

Chapter 2: How to Draw the Human Body ④ Hands Part 2
Simplifying the Hand into Shapes
Let's Draw Line Art Based on the Simplified Shapes (Hand)

Drawing Various Hand Poses using Construction
Creating a guide using simple 3D shapes reduces distortion and significantly improves drawing accuracy.

Part 7: Let's draw the feet
Chapter 1: How to draw the human body "Sketch 4: Feet"
Structure of the Foot
Simplifying the Foot into Shapes
Let's Draw Line Art Based on the Simplified Shapes (Foot)

Part 8: Let's try coloring in various ways (Anime coloring + α)
Chapter 1: Coloring the upper body

Chapter 2: Hand Coloring
Chapter 3: Coloring the Feet
Practice: Coloring Feet (Cel Shading + Alpha)
Part 9: Let's try coloring in various ways (thick painting)
Chapter 1: Coloring the upper body
Chapter 2: Hand Coloring
Practice: Coloring Hands (Painterly Style)
Chapter 3: Coloring the Feet
Practice: Coloring Feet (Painterly Style)
Part 10: Let's try coloring in various ways (Grisaille)
Chapter 1: Coloring the upper body
Practice: Coloring the Torso (Grisaille Method)
Chapter 2: Hand Coloring
Practice: Coloring Hands (Grisaille Method)
Chapter 3: Coloring the Feet
Practice: Coloring Feet (Grisaille Method)
TEACHER


Biography
This creator began their career as a nurse before qualifying as a 'Shiho Shoshi' (a certified legal specialist in Japan) and pursuing a career in that field. Taking advantage of spare time while working remotely, they began drawing and soon developed a deep fascination with illustrating the human body and musculature. To share this passion, they create tutorials and diagrams explaining how to draw muscles and human anatomy.